Ever wondered how to draw a money bag that looks as if it could leap off the page? Whether you're a budding artist or just looking to add a creative touch to your notes, mastering this simple yet striking image can give your drawings a new dimension.
Imagine being able to effortlessly sketch a symbol of wealth and prosperity, impressing friends or even using it to spice up your presentations. You don't need to be a professional artist to achieve this; you just need the right guidance.
Dive into this step-by-step guide, and discover how you can transform simple lines into a captivating illustration that grabs attention and holds it. Ready to unleash your inner artist? Let's get started!

Credit: howtodrawforkids.com
Materials Needed
Gathering the right materials makes drawing a money bag easier and more fun. Having simple tools ready helps you focus on your drawing. You do not need many supplies to create a clear and attractive money bag sketch.
Basic art supplies work well for this project. Choose items that feel comfortable in your hand. Using clean paper and good pencils improves your drawing quality.
Pencil
A pencil is essential for sketching the money bag shape. Use a sharp pencil for fine details. A softer pencil helps with shading and darker lines.
Eraser
An eraser fixes mistakes and cleans up lines. A soft eraser avoids damaging the paper. Use a small eraser for precise corrections.
Paper
Use smooth, white paper for better pencil marks. A medium thickness paper prevents tearing. Drawing paper or sketch pads work well.
Colored Pencils Or Markers
Colored pencils or markers add color to your money bag. Choose green, brown, or gold for a classic look. Use light colors for highlights and dark for shadows.
Ruler
A ruler helps draw straight lines if needed. It keeps the design neat and balanced. Use it lightly to avoid heavy marks.

Credit: howtodrawforkids.com
Basic Shapes To Start
Starting a drawing with basic shapes makes the process simple and clear. It helps in building the right structure before adding details. A money bag can look complex, but breaking it down into easy shapes turns it into a fun task.
Use circles, ovals, and rectangles as your foundation. These shapes guide the size and position of each part of the money bag. With these basics, the drawing will have good balance and proportion.
Drawing The Main Body With An Oval
Begin with a large oval to form the main part of the bag. The oval should be slightly wider at the bottom. This shape represents the filled, round look of the money bag.
Adding The Bag’s Neck Using A Rectangle
Draw a narrow rectangle on top of the oval. This shape shows the neck where the bag tightens. Keep it small to show the bag’s opening clearly.
Shaping The Tie With A Small Circle
Place a small circle or oval at the top of the rectangle. This shape will be the knot or tie holding the bag shut. It adds a simple detail that completes the look.
Sketching The Bag Outline
Sketching the bag outline is the first important part of drawing a money bag. This stage sets the base for your entire drawing. A clear and simple outline helps keep your sketch neat and easy to improve later.
Start by drawing a soft, rounded shape that looks like a pouch. Avoid sharp corners to give it a natural, fabric feel. The shape should be wider at the bottom and narrow at the top where the bag will close.
Keep your pencil strokes light and gentle. This allows easy correction and changes. Focus on smooth curves that suggest fullness and softness.
Drawing The Basic Shape
Begin with a large oval or circle for the main body. This shape represents the full part of the money bag. Make it slightly wider at the bottom to show weight and fullness.
Adding The Neck Of The Bag
Next, sketch the narrow neck where the bag ties. Use two short lines coming up from the oval. These lines should angle inward slightly to show the bag closing.
Shaping The Top Closure
Draw a small horizontal oval or curved line on top. This marks where the bag is cinched and tied. Keep this part tight to suggest the bag is closed.
Refining The Outline
- Erase unnecessary lines gently.
- Make curves smooth and connected.
- Check proportions to keep balance.
- Adjust width and height as needed.
Following these steps creates a clear and balanced bag outline. This simple base makes adding details easier and more effective.
Adding Details To The Bag
Adding details to your money bag drawing brings it to life and adds realism. These details help your bag look more three-dimensional and give it character. Small touches like the tie and fabric folds make a big difference in how your drawing feels to the viewer.
Draw The Tie And Folds
Start by sketching the tie that closes the bag at the top. This could be a simple knot or a bow, depending on the style you want.
Pay attention to how the fabric bunches around the tie. Add short lines or curves to show the folds and creases formed by the tightening knot.
These folds don’t have to be perfect or symmetrical. Natural fabric bunches in irregular ways, so let your lines flow freely.
Create Texture And Wrinkles
Texture makes your bag feel more tactile. Use small, light strokes to suggest the roughness or softness of the bag material.
Wrinkles often appear where the bag bends or is pinched, such as near the tie or the bottom corners. Draw gentle curved lines to capture these areas.
Ask yourself: How would this bag feel if you held it? Would it be smooth, rough, or worn out? Let that guide your texture choices.
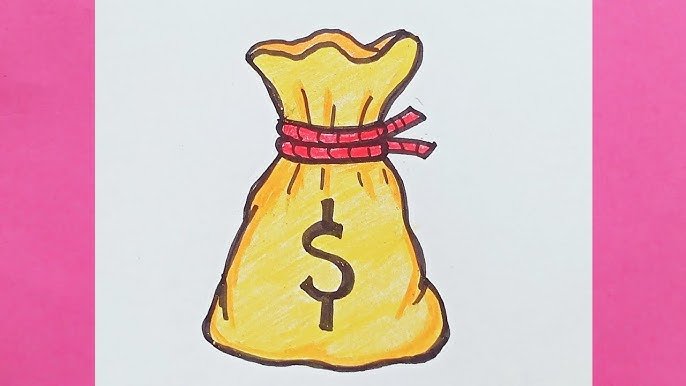
Drawing The Money Symbol
Adding a money symbol to your drawing instantly tells the story of wealth, savings, or business. It’s a small detail, but it can change the whole meaning of your money bag illustration. Getting this symbol right makes your drawing clearer and more eye-catching.
Choosing The Right Symbol
Think about which money symbol fits your drawing’s style and audience. The classic dollar sign ($) is widely recognized, but you might want to use other symbols like the euro (€), pound (£), or yen (¥) depending on your context.
Keep the symbol simple and bold so it stands out. Try sketching a few variations to see which looks best on your money bag. Sometimes, a thicker line or a slight curve can make the symbol easier to read at smaller sizes.
Positioning On The Bag
Where you place the money symbol affects the balance of your drawing. The center of the bag’s front is usually the best spot because it grabs attention immediately.
Try different positions before finalizing. You might find that placing the symbol slightly higher gives the bag more character. Ask yourself: does the symbol’s location enhance the bag’s shape or clutter it?
Inking Your Drawing
Inking your drawing is where your money bag sketch truly starts to come alive. It sharpens your lines and adds depth, giving your artwork a polished, professional look. Taking your time here can make all the difference between a rough sketch and a captivating illustration.
Choosing The Right Tools For Inking
Picking the right pen or brush is crucial. You want something that feels comfortable in your hand and offers control over line thickness. Many artists prefer fine liners for detailed work and brush pens for bolder strokes.
Have you tried different nib sizes? A variety of widths can help you emphasize parts of your money bag, like the folds or the tied string.
Tracing Over Your Pencil Lines
Start by carefully tracing your pencil sketch with your inking tool. Don’t rush—steady, confident lines look better than shaky ones. If a line doesn’t come out as you hoped, remember you can always fix it later or add shadows to mask small imperfections.
Try to avoid going back and forth over the same line multiple times. This can create unwanted blobs or smudges.
Adding Depth With Line Weight
Varying your line thickness adds dimension to your drawing. Thicker lines can define the outer edges of the money bag, while thinner lines work well for texture like fabric creases or the tied string.
Think about where the light hits your bag. Lines on the shadowed side can be bolder, while lighter areas get finer strokes.
Fixing Mistakes And Cleaning Up
Mistakes happen, and that’s okay. Use a white gel pen or a fine brush with white ink to correct small errors. After the ink dries, gently erase any leftover pencil marks to keep your drawing crisp.
Have you noticed how a clean finish makes your drawing feel more complete? It’s a simple step that elevates your artwork instantly.
Coloring Techniques
Coloring your money bag drawing can bring it to life and add depth to your art. The right coloring techniques make your drawing more appealing and realistic. Let's look at how selecting the right colors and adding shading and highlights can enhance your money bag illustration.
Selecting Colors
Choosing the right colors sets the mood and style of your money bag. Traditional money bags often use shades of brown or beige to resemble cloth or leather. But don't hesitate to experiment with greens, golds, or even blues if you want a modern or playful look.
Think about the texture you want to show. A smooth leather bag might need richer, deeper tones, while a rougher sack could use lighter, matte colors. You can also add small color variations to make the surface look more natural and less flat.
Shading And Highlights
Adding shading creates the illusion of depth and makes your money bag look three-dimensional. Identify your light source—where the light hits the bag—and darken the opposite sides with soft shadows. This contrast gives volume to your drawing.
Highlights are just as important. Use lighter shades or even white to show where the light reflects off the bag. This step can add a shiny or textured effect, depending on your chosen material.
Try blending your colors smoothly for a soft, realistic look or use sharper contrasts for a stylized effect. How do you want your money bag to feel—soft and worn, or crisp and new? Your shading choices will answer that.

Credit: www.youtube.com
Adding Final Touches
Adding final touches to your money bag drawing brings it to life. These small details make your artwork stand out. They help create depth and interest. Spend time refining the last elements to enhance the overall look.
Background Options
Choose a background that fits your money bag. A simple color gradient adds depth. Try soft shadows to ground the bag on a surface. You can sketch a wooden table or a stack of coins behind it. Keep backgrounds subtle to avoid distraction.
- Light gray or beige tones create a soft backdrop.
- A textured pattern can add visual interest.
- Shadows under the bag give a sense of space.
- Draw faint lines to suggest a table or floor.
Extra Details For Realism
Small details improve realism in your drawing. Add creases and folds to the fabric of the bag. Draw stitching lines around the edges. Highlight the tied string with shadows and light. Show slight wrinkles where the bag bends. Use soft shading to show light and dark areas.
- Include tiny fabric textures for authenticity.
- Show light reflecting on any coins or metal parts.
- Use thin lines for subtle threads or strings.
- Add slight wear marks for a used look.
Common Mistakes To Avoid
Drawing a money bag might seem simple, but it’s easy to make mistakes that can throw off the entire look. Avoiding these common errors will help your drawing look more realistic and appealing. Paying attention to small details can make a big difference in your artwork.
Incorrect Proportions
One of the biggest mistakes is getting the proportions wrong. If the bag's body is too narrow or the neck too wide, it won’t look natural. Try to keep the bag’s shape balanced, with a rounded body and a snug, slightly gathered top.
Ask yourself if the bag looks like it could actually hold coins or bills. If not, adjust the size before moving on.
Flat Or Stiff Lines
Using straight, stiff lines can make the money bag look lifeless. Real fabric folds and creases have curves and softness. Try sketching gentle curves around the tied area to show that the bag is cinched tightly.
Think about how cloth behaves—does your drawing capture that flexibility?
Ignoring Shadows And Highlights
Many skip adding shadows or highlights, but these are essential for depth. Without shading, your money bag will appear flat and unrealistic. Use light and dark areas to show where the fabric folds and where light hits the surface.
Where would the light source be in your drawing? Placing shadows accordingly can bring your money bag to life.
Overcomplicating Details
Adding too many tiny details like excessive stitches or overly complex textures can clutter the drawing. Simplicity often works better, especially if you’re aiming for a clear, recognizable money bag. Focus on key elements like the tied neck and a clear bag outline.
Does your drawing communicate the idea without unnecessary noise?
Neglecting The Bag’s Closure
Forgetting to show how the bag is tied or closed can confuse viewers. The tied string or ribbon is crucial to show the bag is holding money securely. Make sure to add visible knots, loops, or even a drawstring to give it that finishing touch.
Imagine if your bag was loose—would the money stay inside? Show closure clearly to avoid this confusion.
Tips For Improving Your Drawing Skills
Improving your drawing skills takes patience and practice, but small changes in your approach can make a big difference. Whether you're sketching a simple money bag or working on more complex designs, sharpening your skills helps you create cleaner, more confident lines. Think about the techniques you use and how you can challenge yourself to see and draw details more clearly.
Practice Consistently And Focus On Basics
Drawing every day, even for just 10 minutes, trains your hand and eye to work together better. Focus on simple shapes first—circles, ovals, and rectangles—because these form the foundation of your money bag drawing. Have you noticed how breaking complex objects into basic shapes makes drawing easier?
Use References To Understand Details
Looking at real money bags or images helps you notice small details like folds, shadows, and texture. Try sketching from different angles to understand how the bag’s shape changes. This practice strengthens your observation skills and makes your drawings more realistic.
Experiment With Different Tools And Techniques
Don’t stick to one pencil or style. Try using softer pencils for shading or harder ones for fine lines. Adding light and shadow can bring your money bag to life—have you tried blending with a tissue or your finger to soften edges?
Ask For Feedback And Learn From Others
Sharing your drawings with friends or online communities opens you up to new ideas and critiques. Sometimes, a fresh pair of eyes can spot areas for improvement that you missed. What feedback have you received that changed the way you draw?
Keep A Sketchbook To Track Your Progress
Recording your drawings over time shows how much you’ve improved and highlights what still needs work. It’s motivating to see your early sketches next to recent ones. Have you ever compared your first money bag drawing to your latest?
Frequently Asked Questions
How Do I Start Drawing A Money Bag?
Begin by sketching a simple oval for the bag’s base. Then, draw curved lines upward to shape the bag’s body. Add a tied knot at the top for realism.
What Materials Are Best For Drawing A Money Bag?
Use pencils for initial sketches, then fine liners for outlines. Colored pencils or markers work well for shading and adding color.
How Can I Add Depth To My Money Bag Drawing?
Add shading around the bag’s edges and folds. Use darker tones near the knot and lighter shades on raised areas.
What Details Make A Money Bag Look Realistic?
Include a tied string or knot at the top. Draw creases and wrinkles on the fabric. Adding a dollar sign enhances recognition.
Conclusion
Drawing a money bag can be simple and fun. Just follow the steps carefully and take your time. Practice helps you improve with every try. Use basic shapes and add details slowly. Soon, your money bag will look great and clear.
Keep drawing to build your skills and confidence. Art lets you express ideas in many ways. Enjoy the process and share your work with friends. Drawing is a skill anyone can learn and enjoy.