Have you ever struggled with wrapping paper that tears or wrinkles while wrapping gifts? What if you could turn that same paper into a neat, sturdy bag instead?
Learning how to fold wrapping paper into a bag is a simple trick that saves time, reduces waste, and adds a personal touch to your presents. In this guide, you’ll discover easy steps to create your own stylish gift bags right at home.
Keep reading, and you’ll never look at wrapping paper the same way again!
Materials Needed
Gathering the right materials makes folding wrapping paper into a bag much easier. Having everything ready helps you stay organized and finish faster. Use simple tools that you can find at home or in any craft store.
Wrapping Paper
Choose wrapping paper that is strong but not too thick. Thin paper tears easily, while very thick paper can be hard to fold. Pick a size large enough for the bag you want to create.
Scissors
Use sharp scissors for clean cuts. Dull scissors can cause jagged edges, making folding harder. Keep the scissors nearby for quick trimming.
Ruler Or Measuring Tape
Measure the paper accurately to get neat folds. A ruler helps make straight lines and even edges. This tool ensures your bag looks professional.
Double-sided Tape Or Glue
Use double-sided tape or glue to hold folds in place. Tape is less messy and easier to use. Glue works well but needs time to dry.
Pen Or Pencil
Mark measurements lightly on the paper with a pencil or pen. This helps guide your folds without making big marks. Erase pencil lines if needed.
Optional: Ribbon Or Twine
Add ribbon or twine to create handles for your paper bag. It makes the bag easier to carry and looks nice. Choose colors that match your paper.
Choosing The Right Wrapping Paper
Choosing the right wrapping paper can make a big difference when folding it into a bag. The texture, thickness, and pattern all affect how well the paper holds its shape and how attractive the final bag looks. Picking the perfect paper can save you time and frustration, and it also makes your gift stand out.
Consider The Paper Thickness And Durability
Thicker wrapping paper works better for folding into a sturdy bag. Thin paper tears easily and may not hold the shape well, especially if the bag will carry something heavy. If you want a reusable bag, opt for heavyweight paper or even kraft paper, which is both strong and easy to fold.
Choose Patterns That Complement The Bag Shape
Busy or intricate patterns can make folding lines more noticeable, so simpler designs often look cleaner. Solid colors or subtle prints allow the bag’s structure to shine without distractions. Think about the occasion too—festive prints might be perfect for holidays, while minimalist styles suit any event.
Look For Wrapping Paper With A Smooth Finish
Paper with a smooth or slightly glossy finish folds more neatly and resists creasing in unwanted places. Matte papers can sometimes crack or wrinkle during folding, which might spoil the bag’s appearance. Feel the paper before you buy it; smoothness often means easier handling and a better final result.
Size Your Paper To Match Your Bag Dimensions
Too small a sheet means extra seams and awkward folds. Too large, and you’ll waste paper or end up with a bulky bag. Measure your gift first and add a few inches for folding edges. Buying larger sheets lets you experiment with different bag sizes, giving you flexibility for future gifts.
Think About The Paper’s Environmental Impact
If you care about sustainability, look for recycled or recyclable wrapping paper. Some glossy or metallic papers aren’t recyclable, which might not fit your values. Choosing eco-friendly paper can make your gift more meaningful and reduce waste.
Measuring And Cutting Paper
Measuring and cutting the wrapping paper is the first important step in making a paper bag. Accurate measurements help avoid waste and create a neat bag. Cutting paper with care ensures clean edges and easy folding later.
Start by deciding the size of your bag. Think about the object you want to put inside the bag. Add extra space for folding and the bottom of the bag. This extra paper makes the bag strong and functional.
Choosing The Right Paper Size
Measure the height, width, and depth of your gift or item. Add 3 to 4 inches to each dimension. This added space helps to fold the paper properly and form the bottom. It also allows room for handles if you want to add them.
Using A Ruler And Pencil For Accuracy
Lay the wrapping paper flat on a clean surface. Use a ruler to mark the measurements. Draw light lines with a pencil for cutting guides. Straight lines make folding easier and the bag look tidy.
Cutting The Paper Cleanly
Use sharp scissors or a craft knife for cutting. Follow the pencil lines carefully. Avoid jagged edges by cutting slowly and steadily. Clean cuts reduce the chance of tearing during folding.
Tips To Avoid Measuring Mistakes
- Double-check all measurements before cutting.
- Measure twice, cut once to save paper.
- Use a flat surface for accurate marking.
- Keep the paper steady to avoid shifting.
Folding The Base
Folding the base of your wrapping paper bag is a crucial step that sets the foundation for a sturdy and neat bag. This part can feel tricky, but with some attention to detail, you’ll create a flat bottom that holds gifts firmly. Think of it as giving your bag a solid ground to stand on—without it, the bag might flop or tear easily.
Creating The Initial Creases
Start by folding the bottom edge of the wrapping paper up about 2-3 inches. Make a sharp crease to mark this fold clearly.
Next, fold the paper back down to the original position to create a guideline for the base. This step helps you visualize how deep your bag’s base will be.
Forming The Bottom Corners
Pinch one bottom corner and fold it inward so the side crease meets the bottom crease. This creates a triangular flap on each corner.
Press the triangle flat, making sure the edges are crisp. This step shapes the bag’s bottom and allows it to expand when opened.
Folding The Triangles To Secure The Base
- Fold the triangle’s tip up towards the center of the base crease.
- Press firmly to create a clean fold that locks the base in place.
- Repeat this on both sides of the bag to balance the bottom.
This technique strengthens the base and prevents the bag from collapsing under weight.
Sealing The Base For Stability
Use double-sided tape or glue along the folded flaps to secure the base firmly. This keeps the folds from shifting when you place items inside.
Have you noticed how a well-secured base makes your bag feel more reliable? Try placing a small gift in your bag and watch it stand confidently without tipping over.
Creating Side Folds
Creating side folds is a key part of turning wrapping paper into a neat bag. These folds shape the sides and give your bag depth. Without side folds, the bag looks flat and cannot hold items well.
Start by laying the wrapping paper flat. Fold the paper vertically to set the width of the bag. Then, create creases on both sides to form the bag's sides. These folds should be even for a balanced look.
Marking The Side Fold Lines
Measure equal distances from the edges of the paper. Use a ruler or your fingers to guide the folds. Mark the lines lightly with a pencil or crease with your fingers. These marks help keep the folds straight.
Folding The Sides Inward
Fold the paper along the marked lines toward the center. Press firmly to create sharp creases. The sides should meet or slightly overlap in the middle. This step forms the main body of the bag.
Flattening And Securing The Side Folds
Press down on the folds to flatten the sides. Use tape or glue to hold the folds in place. Ensure the folds stay tight and neat. This keeps the bag sturdy and ready to fill.
Credit: www.lemon8-app.com
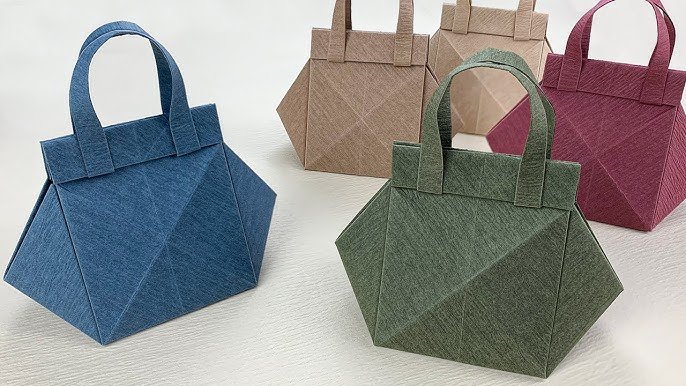
Forming The Bag Shape
Forming the bag shape is where your wrapping paper truly transforms. This step gives your gift a polished, professional look without the need for a store-bought bag. It might seem tricky at first, but with a little patience, you’ll master it quickly.
Creating Clean Folds For Structure
Start by folding the paper in half lengthwise. Press down firmly on the crease to give your bag a strong base. Sharp folds make the bag more stable and easier to handle later.
Next, fold the edges inward to form the sides of your bag. These side folds act like the walls of a box, so keep them neat and symmetrical. Ask yourself: how deep do you want your bag? Adjust the folds accordingly to make it just right for your gift.
Shaping The Bottom Of The Bag
To make the bottom, fold up a section from the paper’s edge—this will be the base. Pinch the corners and fold them in to create a flat bottom. This step is essential because it allows the bag to stand upright on its own.
Try placing your hand inside the forming bag to check the shape. Does the bottom feel sturdy? If it’s floppy, reinforce the folds by pressing them tighter or adding a small piece of tape inside.
Securing The Sides For A Finished Look
Once the shape feels solid, secure the side seams by folding the edges inward again and taping them discreetly. Use clear tape to avoid distracting from the paper’s design. You want your bag to look clean and intentional.
Think about how you’ll close the bag later. Leaving some extra paper at the top can help you fold it over or punch holes for handles. Planning ahead here saves frustration when you’re ready to present your gift.
Securing The Edges
Securing the edges is a crucial part of folding wrapping paper into a bag. If you don’t secure the edges properly, the bag won’t hold its shape or carry items safely. Paying close attention here can save you from frustrating moments when the bag falls apart.
Choosing The Right Tape
Not all tapes are created equal for this task. Clear tape works well because it’s discreet and holds firmly without damaging the paper. Avoid masking tape or duct tape—they can tear the delicate paper and look messy.
Double-sided tape is a personal favorite—it stays hidden and provides a strong bond. Have you ever noticed how some tapes leave sticky residue? That’s why picking a tape that peels off cleanly is smart.
Folding Edges Neatly Before Taping
Before taping, fold the edges crisply. Sharp folds create a clean line and reduce the chance of tearing. Press the fold firmly with your fingers or a flat tool to make it crisp.
Try folding the paper back on itself about half an inch to an inch before taping. This extra layer adds strength and prevents the paper from ripping when the bag holds weight.
Securing The Bottom Edge
The bottom edge carries the most weight, so it needs extra care. Fold the bottom edge up twice to create a solid base. Tape it securely along the entire length to prevent any gaps.
After taping, gently test the strength by pressing down with your fingers. If it feels weak or loose, add more tape or refold to reinforce. Have you ever had a bag fail because of a weak bottom? This step stops that.
Reinforcing Side Seams
Side seams are the next critical spots to secure. Fold the sides inward neatly, then tape along the entire seam to keep the bag’s shape intact. You can also add a second strip of tape inside for extra durability.
If you want your bag to hold heavier items, consider folding a small flap inside before taping. This distributes the pressure and strengthens the sides. What types of items do you plan to carry? Adjust the reinforcement accordingly.

Credit: www.youtube.com
Adding Handles
Adding handles to your wrapping paper bag transforms it from a simple container into a practical and stylish gift carrier. Handles make it easier to carry and give your handmade bag a polished, finished look. You don’t need special tools or materials—just a bit of creativity and some common household items.
Choosing The Right Material For Handles
Think about what you have at home before buying anything new. Ribbon, yarn, twine, or even leftover fabric strips work well. Each material gives a different vibe—ribbon feels elegant, while twine adds a rustic touch.
Consider the weight of your gift too. Heavy items need stronger handles like thick twine or braided yarn. Light gifts can easily be carried with thin ribbon or paper handles.
Attaching Handles Securely
Secure handles properly to avoid any awkward gift drops. Punch holes near the top edges of the bag with a hole puncher or the tip of scissors. Thread your chosen material through these holes and knot the ends inside the bag.
For extra strength, reinforce the holes with small pieces of tape or glue before threading handles. This simple step prevents tearing and keeps your bag sturdy.
Creative Handle Ideas To Try
- Use braided paper strips from leftover wrapping paper for eco-friendly handles.
- Loop a thin scarf or strip of fabric for a soft, unique touch.
- Try twisted newspaper strips for a recycled and textured look.
Which materials do you already have that could work as handles? Experimenting with different textures and colors can make your bag truly one of a kind.
Decorating Your Wrapping Paper Bag
Decorating your wrapping paper bag adds a personal touch and makes your gift stand out. Small details can turn a simple bag into something special. Use colors, textures, and shapes to create a festive look that fits the occasion. Decorating also makes the bag feel more thoughtful and unique.
Using Ribbons And Bows
Ribbons and bows add color and charm to your wrapping paper bag. Choose ribbon colors that match your wrapping paper. Tie a neat bow around the bag’s handle or near the top edge. Curl thin ribbons for a playful, curly effect. Secure ribbons with glue dots or tape to keep them in place.
Adding Gift Tags And Labels
Gift tags give your bag a personal message or name. Use small cards or paper cutouts for tags. Write a simple note or the recipient’s name clearly. Attach tags with string or ribbon to the bag handle. This adds a nice finishing touch and helps identify the gift.
Using Stickers And Stamps
Stickers and stamps decorate your bag easily and quickly. Pick stickers that match the gift theme or holiday. Place stickers in groups or patterns for a creative look. Use rubber stamps with colorful ink to add shapes or designs. Both options add fun details without much effort.
Incorporating Natural Elements
Natural elements give your bag a rustic and elegant style. Add small pinecones, dried flowers, or leaves. Attach them with twine or glue near the bag’s opening. These items add texture and a natural scent. Natural decorations work well for eco-friendly wrapping ideas.

Credit: www.skiptomylou.org
Tips For Durable And Neat Bags
Creating a wrapping paper bag that lasts and looks tidy takes more than just folding. Paying attention to details like reinforcement and clean edges can make a huge difference. You want your bag to hold gifts securely while impressing with a sharp finish.
Choose Thick Wrapping Paper Or Double Layers
Thin wrapping paper tears easily, especially at the bottom or handles. Using thicker paper or doubling up layers adds strength without bulk. Try folding one piece inside another to create a sturdy base that won’t give out when you carry heavier items.
Reinforce The Bottom And Handles
The bottom of your bag takes the most weight, so reinforce it with an extra layer of paper or a small piece of cardboard. For handles, twist or braid leftover paper strips and attach them securely. This stops handles from snapping and keeps your bag reliable.
Make Crisp Folds And Sharp Creases
Neat bags start with clean folds. Use a ruler or the edge of a book to press folds sharply. Crisp creases help the bag keep its shape and give it a professional look that feels satisfying to hold and gift.
Use Tape Strategically To Hide Seams
Clear tape can hold your bag together without ruining its appearance. Place tape on the inside folds or under handles to keep it out of sight. This trick keeps your bag looking smooth and avoids awkward sticky spots.
Trim Excess Paper For A Clean Finish
Uneven edges can make your bag look messy. After folding, trim any extra paper along the edges for a polished result. A tidy outline makes the whole bag feel well-made and more durable.
Have you noticed how just a little extra care in folding changes the whole experience of gift giving? What small step could you add to your next wrapping paper bag to make it last longer and look better?
Frequently Asked Questions
How Do You Start Folding Wrapping Paper Into A Bag?
Begin by cutting a large rectangle of wrapping paper. Fold the paper in half lengthwise, then crease the edges firmly to shape the bag.
What Materials Are Needed To Make A Wrapping Paper Bag?
You need a sheet of wrapping paper, scissors, tape or glue, and optionally ribbon or string for handles. These materials keep the bag sturdy and attractive.
Can Wrapping Paper Bags Hold Heavy Items?
Wrapping paper bags can hold light to medium-weight items. For heavier objects, reinforce the bag with extra layers or use thicker paper for durability.
How Do You Create Handles For Wrapping Paper Bags?
Cut two strips of paper or use ribbon. Attach them securely to the top edges of the bag with tape or glue for easy carrying.
Conclusion
Creating a bag from wrapping paper is easy and fun. This simple skill adds a personal touch to gifts. No need for store-bought bags anymore. Just follow the steps and practice a bit. You'll soon impress friends and family with your creativity.
Remember to choose sturdy paper for best results. Enjoy the process and the satisfaction it brings. Perfect for birthdays, holidays, and more. Keep practicing, and soon you'll be a wrapping paper pro. Happy crafting!