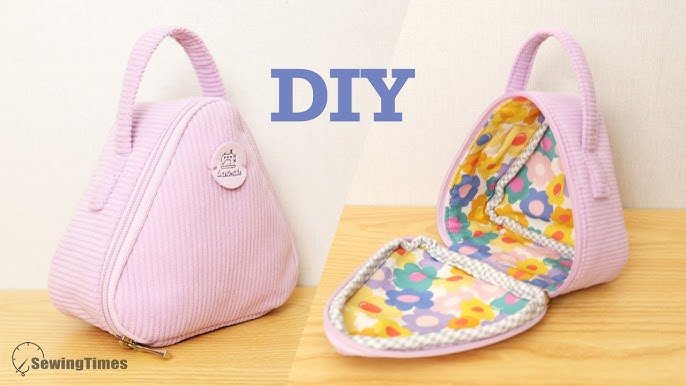
Have you ever wanted a makeup bag that fits your style perfectly? Imagine carrying your favorite products in a bag you made yourself.
Sewing a makeup bag with a zipper might sound tricky, but with the right steps, you can do it easily. This guide will show you exactly how to create a stylish, practical bag that keeps everything safe and organized. Ready to turn simple fabric into your new favorite accessory?
Keep reading, and you’ll be surprised at how fun and rewarding this project can be.

Credit: www.youtube.com
Materials Needed
Gathering the right materials is key to sewing a makeup bag with a zipper that looks professional and lasts long. Choosing fabrics and zippers that suit your style and purpose makes the project more enjoyable and the result more satisfying. Let’s look at what you need before you start stitching.
Fabric Choices
Pick a fabric that’s both durable and easy to clean, since makeup bags often encounter spills. Cotton canvas is a great option—it’s sturdy and can handle some wear and tear. If you want something waterproof, consider oilcloth or laminated cotton; these fabrics wipe clean easily.
Have you thought about adding a lining? A smooth polyester or nylon lining can protect your bag’s contents and make your makeup bag feel more polished. Don’t forget to prewash your fabric to avoid shrinkage after sewing.
Zipper Selection
The zipper is the star of your makeup bag. Choose a zipper length that matches your bag size, typically between 7 to 9 inches. Nylon coil zippers are flexible and easy to sew, perfect if you’re new to zipper installation.
Think about the zipper pull too. A larger pull can make opening and closing easier, especially if your hands are in a hurry. Avoid metal zippers if you want a lightweight bag, as they tend to be heavier.
Additional Supplies
- Sewing machine:Essential for neat, strong stitches.
- Thread:Use polyester thread for durability, matching your fabric color.
- Scissors or rotary cutter:Sharp tools make cutting fabric clean and simple.
- Pins or clips:Keep fabric pieces aligned while sewing.
- Measuring tape or ruler:Accuracy matters when cutting fabric and placing the zipper.
- Iron:Press seams flat for a crisp finish.
Do you have all these on hand? Having everything ready before you start will save you frustration later and keep your project on track.
Preparing Fabric Pieces
Preparing fabric pieces is the first and most important part of sewing a makeup bag with a zipper. This step sets the foundation for the entire project. Cutting the fabric accurately ensures the bag will have the right shape and size. Marking seam allowances helps keep the stitches neat and strong. Careful preparation saves time and avoids mistakes later.
Measuring And Cutting
Start by choosing your fabric and lining. Use a ruler or measuring tape to measure the fabric pieces for the bag and lining. Cut two rectangles for the main bag and two for the lining. Each piece should be the same size. Use sharp scissors or a rotary cutter for clean edges. Place the fabric on a flat surface for accurate cutting.
Marking Seam Allowances
Next, mark seam allowances on each fabric piece. Use a fabric marker or chalk. A typical seam allowance is 1/4 inch. This space allows sewing the pieces together without shrinking the bag size. Draw lines along the edges inside the fabric pieces. These guides help keep your sewing straight and even. Mark both the main fabric and lining pieces.
Attaching The Zipper
Attaching the zipper is a key part of sewing your makeup bag. It holds the bag together and keeps your items secure. This step needs care and attention to detail. A smooth zipper installation makes your bag look neat and professional.
Pinning The Zipper
Place the zipper face down on the fabric edge. Align the zipper teeth with the fabric seam allowance. Use pins to hold the zipper in place. Pin evenly to avoid puckering or shifting. Start pinning at one end and work to the other. Make sure the zipper pull can move freely.
Sewing Along The Zipper
Use a zipper foot on your sewing machine. This helps sew close to the zipper teeth. Sew slowly and carefully along the pinned edge. Keep the fabric flat and smooth while stitching. Backstitch at the start and end for strength. Check that the zipper opens and closes easily.

Credit: www.youtube.com
Constructing The Bag Body
Constructing the bag body is where your makeup bag begins to take real shape. This part is all about assembling the fabric pieces so they fit perfectly together, setting the stage for a neat and functional pouch. It might seem tricky at first, but with careful sewing and a bit of patience, you’ll create a sturdy frame ready for that zipper and lining.
Sewing Fabric Sides
Start by placing your fabric pieces right sides together. This means the pretty sides of the fabric face each other, hiding the seams inside once turned.
Pin the sides carefully to keep the fabric from shifting as you sew. Use a straight stitch and sew along the pinned edges, leaving the top open for the zipper.
Remember to backstitch at the beginning and end to secure your seams. This step is crucial to avoid any unraveling when the bag is in use.
Creating The Bottom Corners
To give your makeup bag a structured base, you’ll create boxed corners. After sewing the sides, flatten each corner and align the side seam with the bottom seam.
Pin across the corner, then sew a straight line about 1 to 1.5 inches from the tip of the corner. This small detail transforms your bag from flat to three-dimensional.
Cut off the excess fabric beyond the seam to reduce bulk. Do you notice how this simple trick adds so much stability? It’s like giving your bag a solid foundation that holds its shape.
Finishing Touches
Finishing touches can make or break your makeup bag project. They ensure your bag looks neat and lasts longer. Paying attention to these final steps gives your handmade bag a professional feel that you'll be proud to show off.
Adding Lining
Adding lining not only hides raw seams but also strengthens the bag. Choose a smooth fabric like cotton or satin for easy access to your makeup items. Cut the lining slightly smaller than the outer fabric to avoid bulk when sewing.
Attach the lining by sewing it to the zipper tape edges, then stitch the lining edges together inside the bag. This creates a clean interior finish and prevents your cosmetics from catching on rough edges. Have you noticed how a lined bag feels more polished and durable?
Topstitching Edges
Topstitching the edges around your zipper and bag adds durability and a sharp look. Use a slightly longer stitch length for a neat appearance. This step keeps the fabric flat and prevents it from shifting when you unzip the bag.
Try stitching close to the zipper teeth without catching them. This takes practice but makes your makeup bag easier to use and more attractive. Isn’t it satisfying when your bag looks as good on the outside as it does inside?
Care Tips For Your Makeup Bag
Taking care of your handmade makeup bag keeps it looking fresh and lasting longer. Simple habits protect the fabric and zipper from damage. Clean your bag often to avoid stains and dirt buildup.
Proper storage helps maintain its shape and prevents unnecessary wear. Following a few easy care tips ensures your makeup bag stays neat and functional every day.
Cleaning Your Makeup Bag Safely
Use a gentle soap and warm water to clean the fabric. Avoid harsh chemicals that can weaken the material.
- Spot clean stains immediately with a soft cloth.
- Hand wash the bag instead of machine washing.
- Allow the bag to air dry completely before use.
Maintaining The Zipper
Keep the zipper running smoothly by removing dirt and debris regularly.
- Use a soft brush to clean between zipper teeth.
- Apply a small amount of zipper lubricant or wax if needed.
- Always unzip and zip gently to avoid damage.
Storing Your Makeup Bag
Store your bag in a cool, dry place away from direct sunlight. This prevents fading and material breakdown.
- Keep the bag empty when not in use to maintain shape.
- Use tissue paper inside the bag to support structure.
- Avoid placing heavy items on top of the bag.

Credit: www.youtube.com
Frequently Asked Questions
How Do I Choose Fabric For A Makeup Bag?
Select durable, water-resistant fabric like canvas or nylon. These materials protect contents and are easy to clean. Avoid delicate fabrics to ensure longevity and practicality for daily use.
What Type Of Zipper Is Best For Makeup Bags?
Use a nylon coil zipper for flexibility and smooth operation. It resists rust and works well with various fabric types, making it ideal for makeup bags.
How Do I Sew A Zipper Without Puckering Fabric?
Pin the zipper carefully and sew slowly with a zipper foot. Use a stabilizer or interfacing to keep fabric flat and prevent puckering during sewing.
Can I Add Compartments Inside The Makeup Bag?
Yes, you can sew fabric dividers or pockets inside. This helps organize items and maximizes storage space efficiently.
Conclusion
Creating your own makeup bag is simple and rewarding. You now know how to sew a makeup bag with a zipper. Gather your materials and follow the steps. Enjoy the process of sewing and personalizing your bag. A handmade makeup bag adds a personal touch to your collection.
It also makes a thoughtful gift for friends. Remember, practice makes perfect. With time, your sewing skills will grow. Start today and create something beautiful. Happy sewing!