Are you looking to elevate your bag-making skills? Sewing a zipper into a bag with lining might seem daunting, but with the right guidance, you can master it like a pro.
Imagine the satisfaction of creating a bag that’s not only functional but also stylish, with a smooth-operating zipper that adds a professional touch. You deserve to make bags that you’re proud of, and knowing how to insert a zipper correctly is a key step.
In this guide, you'll discover simple, step-by-step instructions that will transform your sewing projects. Ready to unlock the secret to sleek and secure zippers? Let’s dive in and make sewing a zipper into a bag with lining your new favorite skill!
Materials Needed
Sewing a zipper into a bag with lining requires a few specific materials to make the process smooth and successful. Having the right tools and supplies can save you time and frustration. Let’s look at what you’ll need before you start.
Zipper
Choose a zipper that fits the size of your bag opening. A nylon coil zipper works well for most fabric bags because it’s flexible and durable. Consider the color and length carefully—matching the zipper to your fabric creates a clean look.
Fabric For The Bag And Lining
You’ll need fabric for both the outer bag and the lining. Sturdy fabrics like canvas or denim work great for the outside, while a lighter, smooth fabric suits the lining. Having contrasting fabrics can add a nice touch, but make sure both are easy to sew.
Sewing Machine And Needles
A sewing machine speeds up the process, especially when sewing through multiple layers. Use a sharp needle designed for the fabric type—denim needles for heavy fabrics, universal needles for lighter ones. Don’t forget to test the needle on scrap fabric first.
Thread
Pick a strong, all-purpose polyester thread. It holds up well under stress and works with most fabrics. Matching your thread color to the fabric or zipper keeps stitches discreet, but contrasting thread can add a decorative touch if you prefer.
Additional Tools
- Pins or clips:To hold fabric layers and zipper in place while sewing.
- Seam ripper:For fixing mistakes without damaging fabric.
- Fabric scissors:Sharp scissors help cut fabric cleanly.
- Measuring tape or ruler:To ensure precise measurements.
- Iron:Pressing seams can make sewing easier and neater.
Do you already have some of these materials at home? Gathering everything before you begin makes the sewing process feel less overwhelming and more enjoyable.

Credit: www.youtube.com
Choosing The Right Zipper
Choosing the right zipper is a key step for sewing a bag with lining. The zipper must fit the bag size and the fabric type. It affects both the bag’s look and function. Picking a zipper that is strong and smooth helps make the bag durable and easy to use.
Many zipper types exist, but not all suit bags with lining. Some zippers are better for thick fabrics while others work well with thin materials. The zipper’s length and teeth size matter too. The right choice ensures the zipper works well without damaging the lining.
Types Of Zippers Suitable For Bags
There are mainly three types of zippers good for bags:
- Coil Zippers:Lightweight and flexible. Good for most fabric types.
- Metal Zippers:Strong and durable. Best for heavy fabrics and outdoor bags.
- Plastic Molded Zippers:Sturdy and smooth. Great for casual bags and backpacks.
Choosing The Right Length And Width
Measure the bag opening carefully before selecting a zipper. A zipper too short or too long can cause problems. Pick a zipper that fits the bag’s width exactly. The zipper teeth size should match the bag’s weight. Large teeth suit heavy fabrics. Small teeth work better with light fabrics.
Considering The Zipper Pull And Slider
The zipper pull should be easy to grip. A large pull helps when hands are cold or busy. Sliders must move smoothly without getting stuck. Check the zipper slider matches the zipper teeth type. This ensures smooth opening and closing.
Preparing The Bag Fabric
Preparing the fabric for your bag is a crucial step that sets the foundation for a neat and professional zipper installation. Choosing and cutting the right pieces ensures your bag’s shape and structure come out just as you envision. Pay close attention to details here, as precision now saves you frustration later.
Cutting The Outer Fabric
Select a durable fabric that matches your bag’s purpose. Think about texture and weight—heavy canvas or denim works well for sturdiness, while lighter cotton suits casual styles.
Lay your fabric flat and smooth out any wrinkles. Use sharp scissors or a rotary cutter for clean edges.
Cut the pieces according to your pattern, adding seam allowances. Don’t forget to mark important points like zipper placement and pocket locations. These marks guide your sewing and keep everything aligned perfectly.
Cutting The Lining Fabric
The lining fabric should complement the outer fabric but be lighter and softer to protect the bag’s contents. Cotton or polyester blends are popular choices.
Cut the lining pieces using the same pattern as the outer fabric but omit seam allowances if your pattern calls for it. This allows the lining to fit snugly inside the bag without bulk.
Consider adding pockets or compartments to the lining. Mark these details clearly before cutting, so you can sew them in place easily later.
Marking The Zipper Placement
Marking the zipper placement is a key step in sewing a zipper into a bag with lining. It ensures the zipper fits perfectly and looks neat. Accurate marking prevents mistakes and saves time during sewing.
Take your bag pieces and lay them flat. Smooth out any wrinkles to get an even surface. Use a ruler or measuring tape to find the exact spot for the zipper.
Measure The Zipper Length
Check the zipper length against the bag opening. Mark the start and end points clearly. Ensure the zipper is slightly shorter than the bag edge.
Mark The Seam Allowance
Add seam allowance marks on both sides of the zipper line. Usually, a ¼ inch to ½ inch allowance works well. These marks help guide sewing and keep fabric in place.
Use Tailor’s Chalk Or Fabric Marker
Choose a marking tool that shows on your fabric but won't leave permanent stains. Tailor’s chalk or a washable fabric marker works best. Mark lightly so lines are easy to remove later.
Double Check Your Marks
Before sewing, compare your marks on both the bag and lining. Make sure they align perfectly. Adjust any marks that look off to avoid zipper misalignment.
Attaching The Zipper To The Outer Fabric
Attaching the zipper to the outer fabric is a crucial step that sets the foundation for your bag’s look and function. Getting this right ensures the zipper lies flat and operates smoothly, giving your project a professional finish. Let’s focus on how to align and secure the zipper so it fits perfectly with your outer fabric.
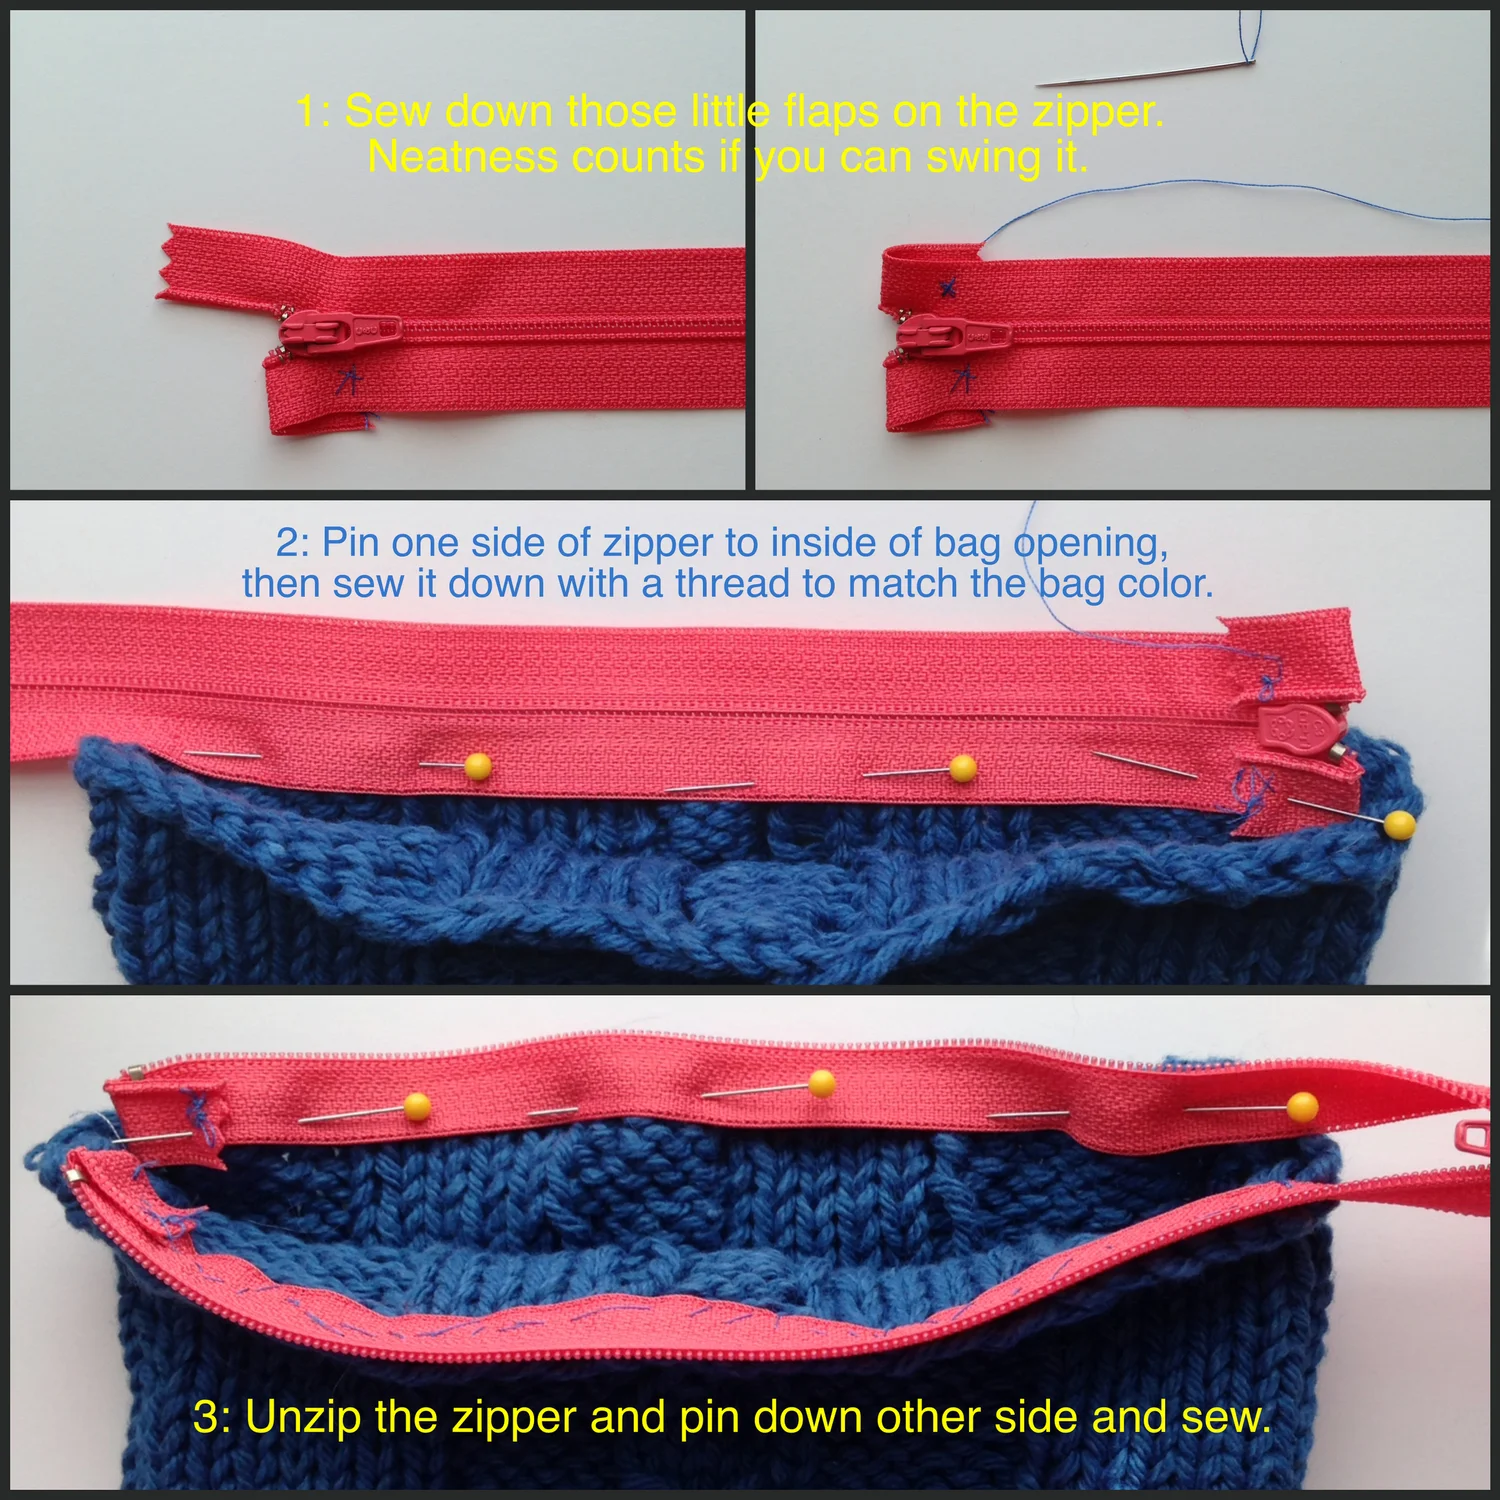
Preparing The Fabric And Zipper
Start by pressing your outer fabric to remove any wrinkles. This creates a smooth surface for sewing and helps the zipper lie flat. Next, place the zipper face down along the edge where you want it attached. Pin it carefully, making sure the zipper tape aligns with the fabric edge.
Have you noticed how a misaligned zipper can ruin even the most stylish bag? Taking a moment to check your alignment now saves you from frustration later.
Pinning And Basting The Zipper
Use plenty of pins or clips to hold the zipper in place. This prevents shifting as you sew. If you want extra stability, try basting the zipper by hand before machine sewing. Basting stitches are temporary but help keep everything perfectly aligned.
Personally, I find that hand basting gives me confidence, especially with slippery or thick fabrics. It’s a simple trick that’s worth the extra time.
Sewing The Zipper To The Outer Fabric
Attach your zipper foot to the sewing machine for close stitching along the zipper teeth. Sew slowly and steadily, removing pins as you go. Keep your stitching straight and close to the zipper coil to ensure durability and a neat finish.
Watch out for fabric bunching or puckering. If it happens, stop and adjust your fabric before continuing. Would you rather fix it now or rip out messy seams later?
Pressing The Zipper Seam
After sewing, press the seam carefully. Use a pressing cloth to protect the fabric and zipper. Pressing helps set the stitches and flattens the seam allowance, making your bag look crisp and polished.
Pressing isn’t just about looks; it makes the zipper easier to sew into the lining next. Skipping this step can make the next parts more difficult than they need to be.
Sewing The Lining To The Zipper
Sewing the lining to the zipper creates a clean, professional finish inside the bag. It hides raw edges and secures the zipper firmly. This step helps the bag look neat and last longer. Take your time to align the lining carefully with the zipper for smooth sewing.
Start by placing the lining fabric right sides together with the zipper tape. Pin the lining evenly along the zipper edge to avoid shifting. Use a zipper foot on your sewing machine to sew close to the zipper teeth. This foot helps you sew straight and tight without breaking the needle.
Check the seam as you sew to ensure the fabric does not bunch. Press the sewn seam open gently with an iron. This step keeps the lining flat and neat inside the bag. Repeat for the other side of the zipper, attaching the second lining piece the same way.
Straighten The Lining And Zipper Edges
Make sure the lining edges are even with the zipper tape. Trim any extra fabric to reduce bulk. Align both edges so the zipper lays flat and smooth. Pin the edges securely to prevent movement while sewing.
Using A Zipper Foot For Precise Stitching
Attach the zipper foot to your sewing machine. This foot allows stitching close to the zipper teeth. Sew slowly to maintain a straight seam. Avoid sewing over the zipper pull to prevent damage.
Pressing The Seam For A Crisp Finish
Open the seam allowance after sewing. Press the seam flat with a warm iron. Use steam to help the fabric relax. Pressing keeps the lining smooth and the zipper functional.
Assembling The Bag
Assembling the bag is where your project really starts to take shape. This stage brings together all your prepared pieces—the outer fabric, the lining, and the zipper—turning them into a functional item. Paying attention to detail here ensures your bag looks neat and lasts long.
Sewing The Side Seams
Begin by aligning the outer fabric pieces right sides together and do the same for the lining pieces. Pin the sides carefully to keep the layers from shifting while you sew. Sew along the pinned edges with a straight stitch, leaving a small seam allowance—usually about ½ inch.
Don’t forget to backstitch at the beginning and end of each seam to strengthen them. After sewing, press the seams open with an iron; this step helps reduce bulk and makes the bag’s edges crisp. How often do you skip pressing and then regret it during the final assembly?
Finishing The Corners
Sharp corners can be tricky but make a big difference in the bag’s overall look. To get clean corners, clip the seam allowance diagonally near the corner without cutting into the stitches. This allows the fabric to lie flat when you turn the bag right side out.
Another useful tip is to trim the seam allowance to reduce thickness, especially if you’re working with thick fabrics. When you turn the bag through the opening, use a blunt tool like a chopstick to gently push out the corners fully. This small effort at the corners makes your bag look professionally made and ready to impress.
Turning The Bag Right Side Out
Turning your bag right side out is a crucial step that reveals all your hard work. It's the moment when your sewing project starts to look like a real bag. This process requires patience and a gentle touch to avoid stressing the seams or the zipper.
Preparing The Opening For Turning
Before flipping the bag, make sure you leave an opening in the lining or the outer fabric. This gap is essential to pull the entire bag through without damaging the stitches.
Check that the zipper is fully unzipped; this gives you enough room to maneuver the fabric. You don’t want to struggle with a stuck zipper and risk breaking your needle or ripping the fabric.
Gently Pulling The Bag Through
Start by pushing the corners of the bag from the inside out using your fingers or a blunt tool like a chopstick. Be careful not to poke through the fabric.
Take your time here—rushing can cause the seams to stretch or the zipper to warp. Smooth out the fabric as you go to prevent any wrinkles or folds from setting in.
Aligning The Lining And Outer Fabric
Once the bag is right side out, check how the lining sits inside the outer fabric. It should lie flat without bunching up.
If you notice any misalignment, gently adjust the lining by pulling or pushing it into place. This ensures your bag looks polished and professional.
Finishing Touches Before Closing The Opening
After turning the bag right side out and aligning the fabrics, press the seams with an iron for a crisp edge.
This helps the bag keep its shape and makes it easier to sew the final closing stitch on the lining opening. Have you ever skipped this step and ended up with a bag that looks lumpy? Taking this extra moment makes a big difference.
Final Touches
After sewing the zipper into your bag with lining, the final touches bring the project together. These small steps enhance the bag's look and make the zipper function smoothly. Pay close attention to detail for a neat and polished finish.
Topstitching Around The Zipper
Topstitching secures the zipper and adds a clean edge. Use a matching or contrasting thread for style. Sew close to the zipper teeth, keeping stitches even and straight. This step prevents fabric from catching in the zipper.
Pressing The Bag
Press the bag carefully to remove wrinkles and set stitches. Use a low heat setting suitable for your fabric. Press along the zipper edges to keep the bag flat and crisp. Avoid pressing directly on the zipper teeth to prevent damage.

Credit: www.youtube.com

Credit: www.youtube.com
Frequently Asked Questions
How Do I Choose The Right Zipper For A Bag?
Select a zipper that matches your bag’s size and fabric weight. Use sturdy zippers for heavy fabrics and lightweight zippers for delicate materials. Opt for nylon or metal zippers based on durability and style preferences.
What Is The Best Stitch For Sewing Zippers In Bags?
A straight stitch works best for sewing zippers into bags. Use a zipper foot on your sewing machine for close, even stitches. This ensures the zipper lies flat and functions smoothly without puckering the fabric.
How Do I Align The Zipper With The Bag Lining?
Align the zipper edges evenly with the lining’s edges. Pin or clip the zipper in place to prevent shifting. Sew slowly to maintain alignment and ensure the zipper opens and closes properly.
Can I Sew A Zipper Into A Lined Bag Without Hand-stitching?
Yes, you can sew a zipper into a lined bag entirely by machine. Use a zipper foot and sew carefully along both sides. Hand-stitching is optional for finishing touches or added durability.
Conclusion
Sewing a zipper into a bag with lining is easier than it seems. Take your time and follow each step carefully. Use the right tools for best results. Practice helps you sew straight and neat stitches. Your bag will look professional and last longer.
Enjoy creating bags that are both useful and stylish. Keep trying, and soon you will sew zippers with confidence. Simple skills like this make sewing more fun and rewarding.