Have you ever been in a rush, only to discover that the zipper on your favorite bag has come undone? It’s a common frustration that can leave you feeling stuck and helpless.
But don’t worry! You’re about to learn a simple and effective way to reattach a zipper on a bag, saving you time and keeping your belongings secure. By the end of this guide, you’ll feel empowered and ready to tackle this pesky problem anytime it arises.
So, let’s get started and ensure your trusty bag is as good as new!

Credit: www.youtube.com
Tools You’ll Need
Before you start fixing that stubborn zipper on your bag, gathering the right tools makes a huge difference. Having everything at hand not only speeds up the process but also ensures a neat, lasting repair. Let's look at the essential tools that will get you back on track quickly.
Basic Sewing Supplies
Every zipper repair begins with a solid foundation of basic sewing supplies. You’ll need:
- Needles:A sharp, sturdy hand-sewing needle designed for heavy fabrics helps you stitch through bag material without hassle.
- Thread:Choose a strong polyester or nylon thread that matches your bag's color for a seamless look.
- Scissors:A small, sharp pair allows you to trim threads neatly and cut any loose fabric.
- Thimble:If you’re working with tough fabrics, a thimble protects your finger and gives you extra push.
- Seam ripper:This tool is handy if you need to remove old stitches carefully without damaging the fabric.
These supplies are probably already in your sewing kit. If not, investing in good-quality basics will pay off beyond just zipper fixes.
Specialized Zipper Tools
Sometimes, fixing a zipper requires more specific tools designed for the job. These include:
- Zipper slider replacement:If the zipper pull or slider is broken, having a replacement set lets you swap it out quickly.
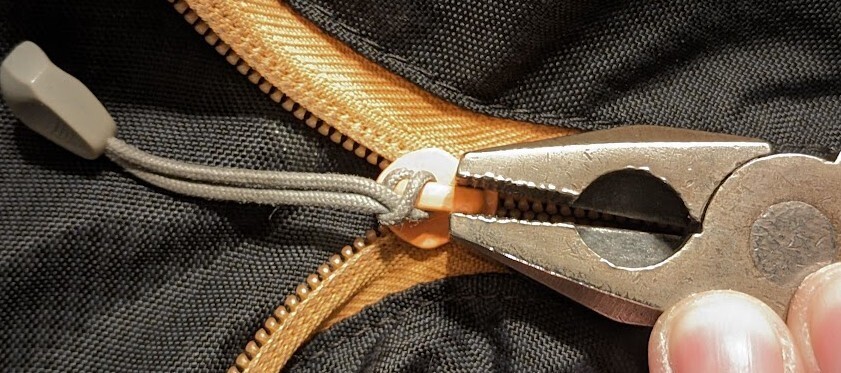
- Pliers:Needle-nose pliers help you gently remove or adjust the zipper stops and sliders without ruining them.
- Zipper stops:These small metal pieces prevent the slider from coming off. Keeping extras on hand can save you from a full zipper replacement.
- Zipper lubricant:A little wax or zipper lubricant can make the zipper glide smoothly after reattachment.
Have you ever tried fixing a zipper without pliers? It’s frustrating and often damages the zipper further. Getting these specialized tools makes your work easier and the results professional.
Assessing The Damage
Before you jump into fixing your bag’s zipper, it’s crucial to understand what’s wrong. Assessing the damage carefully saves time and effort, and it can prevent further harm to your bag. Take a moment to examine the zipper closely—knowing exactly what’s broken helps you choose the right repair approach.
Check The Zipper Teeth
Start by running your fingers along the zipper teeth. Are any teeth missing, bent, or out of alignment? Even a single damaged tooth can stop the zipper from closing properly.
Look for gaps where the teeth don’t mesh together. Sometimes debris or fabric caught between teeth causes the zipper to jam, so don’t overlook that possibility.
Inspect The Slider
The slider is the part that moves up and down to open or close the zipper. Check if it’s loose, cracked, or no longer grips the teeth tightly. If the slider is worn out, the zipper won’t function even if the teeth are fine.
Try sliding it gently—does it catch or move smoothly? A slider that’s too loose might need tightening or replacement.
Look For Fabric Issues
Don’t forget to check the fabric surrounding the zipper. Is it torn, stretched, or frayed near the zipper tape? Sometimes the problem isn’t the zipper itself but the fabric detaching from it.
If the zipper tape is coming off or the stitching is loose, reattaching the zipper might involve sewing or reinforcing the fabric first. Have you ever tried fixing a zipper only to find the fabric was the real culprit?
Removing The Old Zipper
Removing the old zipper is the first step to fix your bag. It requires patience and care to avoid damage. The zipper must be taken out without harming the bag’s fabric. A careful removal helps prepare the bag for a new zipper. Follow simple steps to remove the old zipper safely.
Careful Seam Removal
Start by locating the stitches holding the zipper in place. Use a seam ripper or small scissors for this task. Gently cut the stitches one by one. Avoid pulling too hard to prevent tearing the fabric. Remove all threads attached to the zipper. Keep the bag steady to work easily and safely.
Preserving The Bag Fabric
Take extra care around the fabric edges near the zipper. Do not cut or tear the fabric while removing stitches. If the fabric is delicate, use a magnifying glass to see clearly. Hold the fabric gently to keep its shape. Clean the area from loose threads to prepare for the new zipper. This helps the new zipper fit smoothly and last longer.
Choosing A Replacement Zipper
Choosing the right replacement zipper is key to fixing your bag properly. A zipper that fits well will last longer and work smoothly. Picking the correct zipper helps keep the bag's look and function intact. Focus on size, type, color, and material to find the best match for your bag.
Matching Size And Type
Measure the old zipper length carefully. Choose a zipper the same length or slightly shorter. Match the zipper type to the original for smooth operation. Common types include coil, metal, and molded plastic zippers. Each type fits different bag styles and uses. Using the same type avoids fitting problems and zipper jams.
Considering Color And Material
Pick a zipper color close to the bag's fabric or original zipper. This keeps your repair subtle and neat. Match the zipper tape material with the bag fabric for durability. Nylon tape suits soft bags, while polyester works well for sturdy bags. The zipper teeth material should also fit the bag's style and use.
Preparing The Bag For Attachment
Preparing your bag for zipper reattachment sets the stage for a smooth and lasting fix. Taking time to properly position the zipper before sewing or gluing makes a big difference in how well it functions afterward. Have you ever struggled with a zipper that felt crooked or caught on fabric? Aligning and securing it correctly helps avoid those annoyances.
Aligning The Zipper
First, lay your bag on a flat surface with good lighting. Place the zipper in the exact spot where it originally was or where you want it to be. Check both sides to ensure the teeth line up perfectly and the zipper pull is centered.
Look closely at the fabric edges near the zipper tape. They should meet neatly without bunching or gaps. A misaligned zipper can cause it to snag or not close fully, so take your time here. If your zipper is slightly off, gently adjust it until the alignment feels right.
Pinning Or Clipping In Place
Once the zipper is aligned, hold it securely using pins or sewing clips. Pins work well for thinner fabrics, while clips avoid poking holes and are great for thicker bag materials. Place them evenly along both sides of the zipper tape.
Don’t just pin randomly—space the pins about an inch apart to keep the zipper from shifting as you work. If you’ve ever sewn a zipper only to find it moved out of place, you know how important this step is. Keeping the zipper stable will save frustration and help you sew a clean, straight line.
Have you tried using clips before? They can be a game-changer if you dislike pricking your fingers or damaging delicate fabric. Choose what feels best for your bag and your comfort.

Credit: www.youtube.com
Sewing The Zipper Back On
Sewing the zipper back on your bag requires a bit of patience and precision. Whether you choose to sew by hand or use a sewing machine, the goal is to secure the zipper firmly while maintaining the bag's appearance. Let’s look at some practical tips that can help you achieve a neat and durable result.
Hand Sewing Tips
Hand sewing gives you great control, especially if the fabric is delicate or if you’re working in tight spaces. Use a strong, matching thread and a sharp needle to avoid damaging the material.
- Start by pinning the zipper in place to prevent shifting while you sew.
- Use small, even stitches close to the zipper teeth for a clean finish.
- Try a backstitch for extra strength; it’s perfect for areas that will undergo stress.
- Take your time—rushing can lead to uneven stitching or missed spots.
Have you ever noticed how a slightly crooked zipper can ruin the look of a bag? Hand sewing lets you adjust as you go, which is a huge advantage.
Using A Sewing Machine
A sewing machine speeds up the process and gives consistent stitches that hold well. Make sure you use a zipper foot attachment to get close to the zipper teeth without breaking your needle.
- Set your machine to a straight stitch with medium length for durability.
- Align the zipper carefully and sew slowly to avoid fabric bunching.
- Backstitch at the start and end of your sewing line to lock the stitches.
- Test the zipper after sewing to ensure it moves smoothly without catching.
Have you tried sewing a zipper with a machine before? It might feel tricky at first, but the consistent stitch quality is worth the effort.
Testing The Zipper
After reattaching the zipper on your bag, testing it is essential to make sure everything works as it should. This step helps you catch any problems early and ensures the zipper will last through daily use. Taking the time to check now saves you from unexpected hassles later.
Smooth Operation Check
Start by gently sliding the zipper pull up and down several times. Pay close attention to how smoothly it moves—there should be no sticking or catching. If the zipper glides effortlessly, you’re on the right track.
Try opening and closing the zipper fully to both ends. Does it zip without extra force? If you notice any resistance or hear unusual sounds, something might be off. A smooth zipper means your repair has held strong and the teeth align perfectly.
Addressing Any Issues
If the zipper feels stuck or uneven, don’t ignore it. Check the teeth carefully for misalignment or debris that might block movement. Sometimes, gently realigning the teeth with your fingers can fix the problem.
Lubricating the zipper with a bit of candle wax or a bar of soap can also help ease movement. If the zipper pull seems loose or slips off, tightening it with pliers might be necessary. Have you ever skipped this step and ended up with a zipper that fails at the worst moment? Avoid that frustration by being thorough now.
Maintenance Tips
Proper maintenance extends the life of your bag's zipper. Small efforts prevent common issues and keep the zipper smooth. Regular care avoids the need for frequent repairs or replacements.
Lubricating The Zipper
Lubricating helps the zipper slide easily. Use a pencil, wax, or zipper lubricant. Rub gently along the zipper teeth for smooth movement.
- Graphite from a pencil works well and is easy to find.
- Beeswax or candle wax adds a protective layer.
- Commercial zipper lubricants provide long-lasting results.
Test a small area first to prevent stains. Wipe off any excess lubricant to avoid dirt buildup.
Avoiding Future Damage
Handle the zipper with care to prevent damage. Avoid forcing the zipper if stuck. Check for debris caught in the teeth and remove it gently.
- Do not overfill the bag to reduce zipper stress.
- Keep the zipper closed when not in use.
- Store the bag in a dry place to avoid rust or mold.
Regular inspections help catch small issues early. Fix minor problems before they worsen.
Credit: www.myogtutorials.com
Frequently Asked Questions
How Do I Fix A Zipper That Came Off My Bag?
To fix a zipper that came off your bag, realign the zipper teeth and carefully reinsert the slider. Use pliers to gently press the stopper back in place. Test the zipper to ensure smooth operation before use.
What Tools Are Needed To Reattach A Bag Zipper?
You need basic tools like pliers, a needle, strong thread, and scissors. Optionally, use a zipper stop or fabric glue. These tools help realign, secure, and reinforce the zipper on your bag effectively.
Can I Reattach A Zipper Without Sewing?
Yes, you can use fabric glue or adhesive tape to temporarily reattach a zipper. However, sewing provides a more durable and long-lasting fix for bag zippers.
How Long Does It Take To Reattach A Zipper On A Bag?
Reattaching a zipper on a bag usually takes 10 to 20 minutes, depending on your skill level and tools available. Simple fixes like reinserting the slider are quicker than sewing or replacing stops.
Conclusion
Fixing a zipper on your bag is easier than you think. Follow each step carefully to avoid mistakes. Take your time and use the right tools. A working zipper can make your bag last longer. Keep practicing to improve your skills.
Small repairs save money and reduce waste. Now you can enjoy your bag without worries. Try fixing zippers on other items too. Simple repairs bring big benefits.