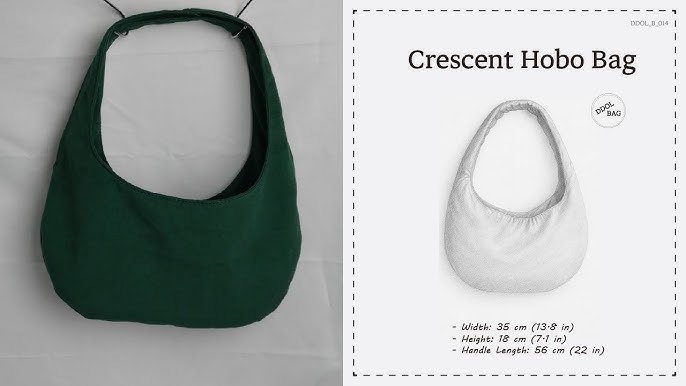
Are you looking to add a personal touch to your style without spending a fortune? Learning how to sew a hobo bag might be just the creative outlet you need.
This guide will not only walk you through each step but will also transform a simple piece of fabric into a chic accessory that's uniquely yours. Imagine the satisfaction of carrying a bag that's designed by you, for you. You'll discover sewing tips that make the process fun and easy, even if you're a beginner.
Ready to unlock your creativity and take your fashion game to the next level? Let's dive in and get started on crafting a hobo bag that’s sure to turn heads.

Credit: www.youtube.com
Materials Needed
Before you start sewing your hobo bag, gathering the right materials is crucial. The quality and type of fabric you choose will affect not only the look but also the durability of your bag. Having the right tools and optional decorations can make the sewing process smoother and the final product more personalized.
Fabric Choices
Think about how you’ll use your hobo bag. Do you want something lightweight for summer or a sturdier fabric for everyday use? Cotton canvas and denim are great for durability, while linen or lightweight cotton works well for casual, easy-to-carry bags.
Choosing a fabric with a nice drape will give your bag that classic hobo shape. If you want to add personality, look for prints or patterns that speak to your style. Remember, pre-washing your fabric prevents shrinking later on.
Essential Tools
- Sewing machine:Speeds up the process and provides strong seams.
- Fabric scissors:Sharp scissors make cutting fabric clean and easy.
- Measuring tape:Accurate measurements help your bag fit your needs perfectly.
- Pins or clips:Keep fabric pieces aligned as you sew.
- Thread:Choose a strong polyester or cotton thread that matches or complements your fabric.
- Iron and ironing board:Pressing seams and fabric makes sewing smoother.
Optional Embellishments
Want to make your hobo bag truly unique? Adding embellishments can elevate your design. Consider buttons, patches, or decorative stitching to add texture and color.
Leather or fabric straps can change the bag’s look and feel. You might also sew on a zipper or magnetic snap for better security. What small detail would make your bag feel more like you?

Credit: www.youtube.com
Preparing The Fabric
Preparing the fabric is a key part of sewing a hobo bag. It sets the foundation for smooth sewing and a neat finish. Taking care in this stage saves time and effort later. The fabric must be measured and cut accurately. Marking seam allowances clearly helps keep your pieces aligned.
Measuring And Cutting
Start by choosing fabric that suits your style and bag size. Use a ruler or measuring tape to measure the fabric pieces. Double-check measurements before cutting. Cut the fabric on a flat surface to avoid errors. Sharp fabric scissors ensure clean edges and prevent fraying. Cut slowly and steadily, following your measurements closely.
Marking Seam Allowances
Seam allowances create space for stitching the bag pieces together. Mark seam allowances on the fabric edges with tailor’s chalk or a fabric marker. A common allowance is 1/2 inch, but check your pattern instructions. Mark all edges to sew clearly and evenly. This step helps the bag keep its shape and fit perfectly.
Sewing The Bag Body
Sewing the body of your hobo bag brings your project to life. This stage transforms flat fabric pieces into a three-dimensional shape that will hold your essentials. Paying attention to detail here ensures your bag looks polished and functions well.
Joining Fabric Pieces
Start by lining up the fabric pieces carefully, matching edges and patterns if your fabric has any. Pin the sides together to keep everything in place while you sew. Using a straight stitch, sew the pieces along the sides, leaving the top open for the bag’s mouth.
Remember to backstitch at the beginning and end to secure your seams. If your fabric frays easily, consider finishing the raw edges with a zigzag stitch or using pinking shears. This step might seem small, but it adds durability to your bag.
Creating The Curved Shape
The unique, slouchy silhouette of a hobo bag comes from shaping the bottom and sides. To create this, gently curve the seams at the bottom corners instead of sewing straight lines. This subtle curve gives your bag that relaxed, rounded look.
Try pinching and folding the fabric before sewing to see how the curve affects the shape. It’s helpful to test on scrap fabric first. Are you aiming for a more structured or floppy bag? Adjusting the curve can make a big difference.
Adding The Strap
Adding the strap to your hobo bag is where functionality meets style. The right strap length and a secure attachment can make or break your bag’s comfort and durability. Let’s break down how to measure and attach the strap so it fits perfectly and holds up to daily use.
Measuring Strap Length
Start by deciding how you want to carry your bag. Do you prefer it slung over your shoulder or worn crossbody? This choice will affect the strap length significantly.
A good rule of thumb is to measure from your shoulder down to where you want the bag to sit. Most shoulder straps range between 20 to 26 inches, while crossbody straps are typically 40 to 50 inches long.
Remember, you can always adjust the strap later, but having a close estimate upfront saves time and frustration. Have you ever ended up with a strap that was too short or too long? Getting this right means no awkward tugging or slipping.
Attaching The Strap Securely
Once you have your strap length, focus on attaching it so it won’t come loose. Using strong stitching and proper reinforcements is key. Double stitching the strap ends to the bag fabric adds the extra strength you need.
Consider using hardware like D-rings or swivel hooks for a professional touch and added durability. These elements distribute weight better and reduce strain on the fabric.
If your strap is made from fabric, folding the ends and sewing them into loops before attaching to hardware can prevent fraying. Have you checked if your thread and needle can handle thick materials? Using heavy-duty thread and a sharp needle makes all the difference.
Finishing Touches
Finishing touches bring your hobo bag to life. They make the bag sturdy and stylish. Small details improve comfort and usability. Let’s explore key steps to complete your project.
Adding Lining
Lining gives your bag a clean inside look. It protects the fabric and hides seams. Choose a soft fabric like cotton or satin. Cut the lining pieces to match your bag size. Sew the lining inside, attaching it to the bag’s edges. Leave an opening to turn the bag right side out. Press the edges flat for a neat finish. A lined bag feels more durable and professional.
Installing Closures
Closures keep your belongings safe inside the bag. Popular options include zippers, magnetic snaps, and buttons. Zippers add security and smooth operation. Magnetic snaps are easy and quick to use. Buttons give a classic look but take more time. Align the closure carefully before sewing. Reinforce stitches to ensure strength. Test the closure to make sure it works well.
Decorative Details
Decorative details make your bag unique. Use trims like ribbons, lace, or leather strips. Add embroidery or fabric paint for personal flair. Attach charms or tassels for extra style. Keep decorations balanced and not too heavy. Small touches add character without clutter. These details express your creativity and make your bag one of a kind.

Credit: www.youtube.com
Care And Maintenance
Taking good care of your hobo bag keeps it looking fresh and extends its life. Proper care and maintenance prevent wear and tear, saving you time and money on repairs. Let’s dive into practical ways to clean and store your handmade accessory effectively.
Cleaning Tips
Regular cleaning is key to preserving your hobo bag's beauty. Use a soft cloth or a gentle brush to remove surface dirt after each use.
If your bag is made of fabric, spot clean with mild soap and cold water. Avoid harsh chemicals that might damage the material or fade colors.
For leather bags, apply a leather conditioner every few months to keep the material supple. Remember, wiping with a damp cloth is usually better than soaking or machine washing.
- Test any cleaning product on a small, hidden area first.
- Air dry your bag after cleaning; avoid direct sunlight to prevent fading.
- Remove any detachable parts like straps or accessories before cleaning.
Storage Suggestions
How you store your hobo bag matters as much as cleaning. Keep it in a cool, dry place away from direct sunlight to avoid discoloration.
Stuff your bag with tissue paper or fabric scraps to maintain its shape when not in use. This prevents unwanted creases or sagging over time.
A breathable fabric dust bag is ideal for storage. Plastic bags can trap moisture, leading to mold or mildew buildup.
- Hang your bag by its strap only if the strap is strong enough to avoid stretching.
- Rotate your bags regularly to prevent constant pressure on one piece.
- Check your stored bags periodically for any signs of damage or pests.
Frequently Asked Questions
What Materials Are Needed To Sew A Hobo Bag?
To sew a hobo bag, you need fabric, lining, thread, a zipper, and a sewing machine. Choose durable fabric like canvas or leather. Also, prepare scissors, pins, and a measuring tape for accurate cutting and assembly.
How Long Does It Take To Sew A Hobo Bag?
Sewing a hobo bag typically takes 2 to 4 hours. This depends on your sewing skills and the bag’s design complexity. Beginners might take longer, while experienced sewers can finish faster.
Can Beginners Sew A Hobo Bag Easily?
Yes, beginners can sew a hobo bag with basic sewing knowledge. Follow step-by-step instructions carefully. Use simple patterns and take your time to practice seams and stitching.
What Sewing Techniques Are Best For A Hobo Bag?
Use straight stitching for seams and topstitching for a polished look. Reinforce stress points with backstitching. A zipper foot helps install zippers neatly. These techniques ensure durability and style.
Conclusion
Sewing a hobo bag is a fun and useful skill. You can choose colors and fabrics you like best. The steps are simple and clear to follow. Practice makes your sewing better every time. A handmade bag adds style to your look.
Enjoy carrying something you made yourself. Start your project today and feel proud. Keep learning and try new designs soon.