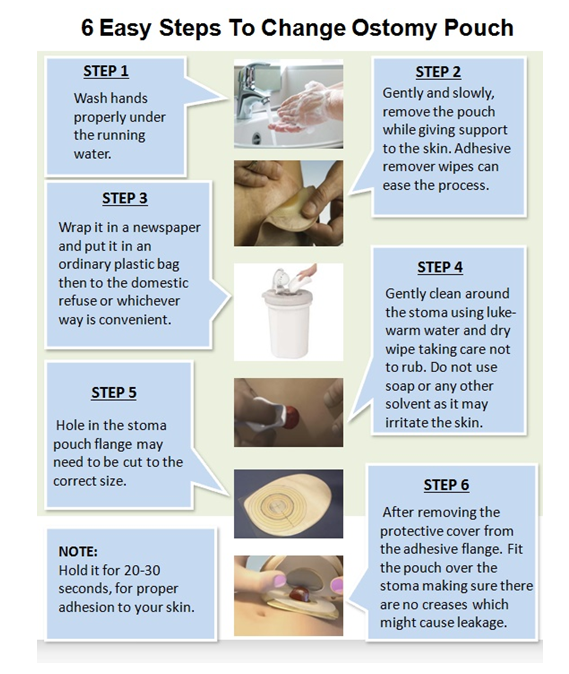
Changing an ostomy bag might seem daunting at first, but it's simpler than you think. You deserve to feel confident and comfortable in every step of your ostomy care.
In this guide, you'll discover how to change an ostomy bag with ease, ensuring your peace of mind and boosting your daily comfort. Imagine the relief of knowing you can handle this task without stress or worry. By the end of this article, you'll gain practical tips and insights that make the process smooth and straightforward.
Let's take the first step together toward mastering this essential skill.
Preparing For The Change
Changing an ostomy bag might feel overwhelming at first, but preparing well can make the process smoother and less stressful. Taking time before you start helps you stay organized and confident. Let’s look at how you can get ready effectively for your ostomy bag change.
Gathering Supplies
Having everything within reach saves you from unnecessary interruptions. Lay out your new ostomy bag, skin barrier, adhesive remover, wipes, and a disposal bag. Don’t forget to keep a small mirror handy if you need to see tricky angles.
Think about adding some barrier cream or powder if your skin tends to get irritated. Preparing these items ahead means you won’t have to scramble mid-change, which keeps things calm and controlled.
Choosing A Comfortable Space
Pick a spot where you feel relaxed and have enough room to work comfortably. A bathroom or bedroom counter with a flat surface often works well. Good lighting is key—can you clearly see your stoma and skin?
Consider sitting down if standing feels tiring. A chair with arm support can make the process easier on your body. Your comfort can directly impact how smoothly the change goes.
Washing Hands And Maintaining Hygiene
Clean hands protect you from infection and keep your stoma healthy. Use warm water and soap to wash your hands thoroughly before you begin. Dry them well with a clean towel or disposable paper towel.
During the change, avoid touching anything unnecessary to reduce germs. If you’re concerned about germs, using gloves is an option, but clean hands alone often suffice. How often do you pause to ensure your hands are clean before starting?

Credit: www.youtube.com
Removing The Old Ostomy Bag
Removing the old ostomy bag is a crucial step in maintaining healthy skin around your stoma and ensuring comfort. It might seem challenging at first, but with the right technique, it becomes a simple routine. Let’s walk through how to remove your ostomy bag safely and gently.
Loosening The Adhesive
Start by gently loosening the adhesive that holds the bag in place. You can use warm water or an adhesive remover wipe to soften the glue, making it easier to peel off. Take your time—ripping the bag off quickly can irritate your skin.
If you notice any resistance, pause and apply more remover or water. This step helps protect your skin from unnecessary trauma and keeps the area comfortable.
Gently Removing The Bag
Once the adhesive feels loose, carefully lift the edge of the ostomy bag. Pull it back slowly, moving your hand downwards rather than upwards to minimize skin irritation. Avoid tugging or pulling harshly, as this can cause discomfort or even skin damage.
Think about how you would remove a bandage from a sensitive spot—slow and steady is key. If you feel any pain, stop and loosen the adhesive further before continuing.
Cleaning The Stoma And Surrounding Skin
After removing the bag, clean your stoma and the skin around it with warm water and a soft cloth or paper towel. Avoid using soaps with oils or fragrances, as these can cause irritation or interfere with the adhesive of your new bag.
Pat the area dry gently—rubbing can harm sensitive skin. Keeping this area clean and dry helps prevent infections and ensures your new bag sticks properly. Have you found a cleaning routine that works best for your skin?
Inspecting The Skin And Stoma
Inspecting the skin and stoma is a vital part of changing an ostomy bag. This step helps keep the area healthy and prevents problems. Carefully checking the skin and stoma before applying a new bag ensures a better fit and comfort. It also helps catch any issues early, avoiding pain or infection.
Checking For Irritation Or Infection
Look closely at the skin around the stoma. The skin should be smooth and free from redness. Irritation may appear as redness, swelling, or small sores. Check for any unusual warmth or tenderness. Signs of infection include pus, bad odor, or increased pain. Clean the area gently with water and avoid harsh soaps.
Identifying Skin Issues
Watch for rashes, peeling, or blisters near the stoma. These might be caused by the adhesive or leakage from the bag. Dry or cracked skin needs special care. Use skin barrier products to protect the area. Keep the skin dry before placing a new bag. Proper skin care helps prevent discomfort and improves bag adhesion.
When To Contact A Healthcare Provider
- Severe redness or swelling around the stoma
- Continuous pain or discomfort
- Signs of infection such as pus or fever
- Changes in stoma size or color
- Skin breakdown that does not heal
Contact a healthcare provider if any of these signs appear. Early treatment can prevent serious complications. Do not wait if the skin or stoma looks unhealthy.

Credit: www.everydayhealth.com
Preparing The New Ostomy Bag
Preparing a new ostomy bag is essential for comfort and skin protection. Proper preparation helps avoid leaks and skin irritation. Take your time to get everything ready before applying the bag.
Cutting The Flange To Fit
Measure the stoma size carefully with a measuring guide. Mark the flange opening on the new bag’s adhesive side. Cut the opening slightly larger than the stoma, about 1/8 inch. Avoid cutting too large to prevent leaks. A clean, round cut ensures a better seal.
Applying Skin Barrier Products
Clean and dry the skin around the stoma before applying any product. Use a skin barrier wipe or spray to protect the skin. Let the barrier dry completely to form a protective layer. This step reduces irritation and helps the bag stick better.
Ensuring Proper Fit And Seal
Align the flange opening carefully with the stoma. Press the adhesive firmly onto the skin, smoothing out wrinkles. Hold it in place for a minute to improve adhesion. Check the edges to make sure the seal is tight and secure. A good seal prevents leaks and keeps skin healthy.
Attaching The New Bag
Attaching a new ostomy bag is a crucial part of the process that requires attention and care. It’s about more than just sticking the bag on; it’s ensuring it fits well and feels secure so you can move comfortably throughout your day. Let's focus on how you can get this step right every time.
Positioning The Bag Correctly
Start by holding the new bag close to your stoma and skin. Make sure the opening aligns perfectly with your stoma without pressing down too hard. You want the bag to sit flat against your skin without any gaps or folds that could cause leaks.
Think about your body shape and movements. Position the bag so it won’t be irritated by clothing or belts. If you’ve noticed discomfort in certain spots before, adjust the placement slightly to avoid those areas.
Securing The Adhesive
Once you have the bag in the right spot, gently press the adhesive onto your skin. Use your fingers to smooth it out from the center outward to remove any air bubbles. This helps the bag stick better and lasts longer.
Don’t rush this part. Take your time to ensure the adhesive fully touches your skin. If you feel any edges lifting, press them down firmly. Your skin must be clean and dry before applying the adhesive to avoid peeling.
Checking For Comfort And Security
After attaching the bag, check how it feels by moving around. Bend, twist, and reach to see if the bag stays in place without pinching or pulling. If anything feels off, it’s okay to remove and reapply.
Ask yourself: Does the bag feel secure enough to last until your next change? Does it cause any irritation? Addressing these questions helps prevent leaks and skin problems later on.

Credit: www.youtube.com
Aftercare And Tips
After changing an ostomy bag, proper care is essential for comfort and health. Good aftercare helps prevent infections and skin problems. Small habits make a big difference. Follow simple tips to feel confident and secure.
Disposing Of The Old Bag Safely
Always place the used bag in a sealed plastic bag. This prevents leaks and bad smells. Throw the sealed bag in the trash, away from children and pets. Do not flush the bag down the toilet. Follow local rules for medical waste if available.
Maintaining Skin Health
Clean the skin gently with warm water and mild soap. Avoid harsh scrubbing or strong chemicals. Pat the skin dry carefully before applying a new bag. Use skin barrier wipes or creams to protect the skin. Check the skin daily for redness or irritation. Change the bag promptly if the skin feels sore.
Managing Odor And Leakage
Empty the bag when it is one-third full to avoid leaks. Use deodorizing drops inside the bag to reduce smells. Ensure the bag fits snugly around the stoma for a tight seal. Replace the bag if it shows signs of damage or leaks. Carry spare bags and cleaning supplies when out.
Building Confidence Over Time
Practice changing the bag in a calm, private space. Take your time and follow each step carefully. Learn from each experience to improve your technique. Talk to a nurse or support group for advice. Remember, confidence grows with practice and patience.
Frequently Asked Questions
How Often Should I Change My Ostomy Bag?
Change your ostomy bag every 3 to 7 days or when leaking occurs. Regular changes prevent skin irritation and maintain hygiene. Always follow your healthcare provider’s recommendations for best results.
What Supplies Do I Need To Change An Ostomy Bag?
You need a new ostomy bag, skin barrier, adhesive remover, warm water, soft cloth, and disposal bag. Prepare a clean workspace and wash your hands before starting.
How Do I Clean The Stoma Before Changing The Bag?
Use warm water and a soft cloth to gently clean around the stoma. Avoid soaps with oils or fragrances. Pat dry completely to ensure the skin barrier sticks properly.
Can I Shower With An Ostomy Bag On?
Yes, most ostomy bags are waterproof and can be worn during showers. Ensure the barrier is secure to prevent leaks. You may need to change the bag sooner if it gets wet.
Conclusion
Changing an ostomy bag can feel tricky at first. Practice helps build your confidence and skill. Take your time and follow each step carefully. Keep your supplies close and work in a clean area. Remember, you control your care and comfort.
Stay patient and gentle with yourself during this process. Soon, it will become a smooth part of your routine. Trust yourself—you are doing a great job managing your health.