Are you ready to unleash your creativity and add a splash of color to your everyday life? If you've ever wanted to stand out from the crowd with a unique accessory, learning how to tie dye a tote bag is the perfect place to start.
Imagine carrying a piece of art that you've created, turning heads and sparking conversations wherever you go. In this guide, you'll discover the simple steps to transform an ordinary tote bag into a vibrant masterpiece. This isn't just about crafting; it's about expressing your style and personality in the most colorful way possible.
Ready to dive in and create something truly one-of-a-kind? Let's get started!
Materials Needed
Tie dyeing a tote bag is a fun and creative project. Gathering the right materials makes the process easier and more enjoyable. Below is a detailed list of what you need to get started.
Choosing The Right Tote Bag
Select a tote bag made of 100% cotton for best dye results. Natural fibers absorb dye better than synthetic ones. Choose a light-colored or white bag to make your colors pop. Avoid bags with coatings or plastic linings, as they block dye absorption. A medium or large size works well for tie dye designs.
Essential Dye Supplies
- Fiber reactive dyes or fabric dyes in your favorite colors
- Plastic squeeze bottles for easy dye application
- Rubber bands to create different patterns
- Plastic gloves to protect your hands
- Plastic bags or wrap to keep the bag moist while dye sets
- Water for mixing and rinsing
- Large container or bucket for soaking the bag before dyeing
Protective Gear And Workspace Setup
Wear old clothes or an apron to avoid stains. Use rubber gloves to keep your hands clean. Cover your workspace with plastic or newspaper to protect surfaces. Work in a well-ventilated area to avoid strong dye fumes. Keep paper towels or wipes nearby for quick clean-ups.
Preparing The Tote Bag
Preparing your tote bag correctly is key to achieving vibrant and lasting tie dye results. Skipping or rushing through these preparation steps can lead to uneven color absorption or unwanted dye bleeding. Taking the time to prep will make your creative process smoother and your final design pop.
Washing And Drying
Start by washing your tote bag without any detergent or fabric softener. This removes any factory finishes or residues that might block the dye from soaking in properly.
Dry the bag completely before you begin tying it. A damp bag can cause the dye to spread unpredictably, so ensure it’s fully dry for better control over your design.
Securing With Rubber Bands
Use rubber bands to section off the tote bag and create patterns. The tighter you wrap the bands, the more defined your white spaces will be.
Try different band placements to experiment with various designs. For example, twist the bag into spirals or fold it into accordion pleats before securing.
Planning Your Design
Think about the colors and patterns you want before applying dye. Sketch your idea or visualize how the folds and bands will affect the final look.
Ask yourself: Do you want bold, contrasting colors or a softer, blended effect? Your answer will guide how you fold and where you place the dye.
Taking this moment to plan saves you from surprises and helps you express your personal style clearly.
Mixing The Dye
Mixing the dye is a crucial step in tie dyeing a tote bag. It affects the vibrancy and clarity of your colors. Preparing the dye correctly ensures your design turns out bright and beautiful. Take your time to follow the right process for mixing the dye.
Selecting Colors
Choose colors that match your style and purpose. Bright colors show well on white or light fabric. Darker colors may not appear clearly on dark bags. Think about color combinations that look good together. Primary colors like red, blue, and yellow mix well to create new shades. Avoid colors that might blend into a muddy tone. Pick two or three colors for the best results.
Measuring And Mixing
Use cold water to mix the dye powder or liquid. Follow the dye package instructions for the right water-to-dye ratio. Use a measuring cup or scale to be precise. Stir the mixture well until the dye dissolves completely. A plastic or glass container works best for mixing. Avoid metal containers, as they can react with the dye. Prepare small batches to keep the dye fresh and vibrant.
Safety Tips For Handling Dye
- Wear gloves to protect your hands from stains and irritation.
- Work in a well-ventilated area to avoid breathing fumes.
- Cover your workspace with plastic or newspapers to prevent stains.
- Keep dye away from children and pets.
- Wash your hands thoroughly after handling the dye.
- Use old clothes or an apron to protect your clothing.

Credit: www.bakerross.co.uk
Applying The Dye
Applying the dye to your tote bag is where the magic truly begins. This step transforms your plain fabric into a vibrant piece of art. It's important to approach this stage with care to ensure your colors turn out just right and your patterns stand out beautifully.
Techniques For Different Patterns
Each tie dye pattern calls for a unique approach to applying dye. For spirals, start by pinching the center of the tote and twisting it into a tight swirl. Then, apply dye to each section created by your folds.
Stripes require folding the bag accordion-style before adding dye in straight lines. If you want a crumple effect, scrunch the fabric randomly and dab dye over it. Experiment with these techniques on a small cloth first to see how the patterns develop.
Layering Colors
Layering colors can add depth and vibrancy to your tote bag. Apply lighter colors first and let them soak in slightly before adding darker shades on top. This prevents muddy colors and keeps your design sharp.
Think about how colors blend—yellow over blue creates green, which might be a cool effect or something to avoid. Try to keep wet sections separate when applying contrasting colors to reduce bleeding.
Avoiding Common Mistakes
Avoid using too much dye, which can cause colors to run and blend into a dull mess. Instead, apply dye sparingly and build up intensity gradually. Over-saturation also makes the fabric heavy and hard to dry.
Don’t forget to wear gloves and protect your workspace to keep things clean. Lastly, ensure your tote bag is folded and secured tightly with rubber bands; loose folds lead to blurry patterns. How will you control your dye application to make your tote bag truly unique?
Setting The Dye
Setting the dye is a crucial step in tie dyeing a tote bag. It locks in the colors and makes the design last longer. Proper setting ensures vibrant, lasting patterns. This part involves wrapping the fabric, controlling the temperature, and rinsing the bag correctly.
Wrapping And Waiting Time
Wrap the dyed tote bag tightly in plastic wrap or a plastic bag. This keeps the fabric moist and helps the dye absorb better. Let it sit for 6 to 8 hours. Some colors may need up to 24 hours for deeper tones. Avoid unwrapping too soon to prevent color fading.
Temperature And Environment
Keep the wrapped tote bag in a warm place. Room temperature between 70°F and 80°F works best. Avoid direct sunlight or cold areas. Warmth helps the dye bond with the fabric fibers. Do not expose the bag to extreme heat or freezing conditions.
Rinsing Process
After waiting, carefully remove the plastic wrap. Rinse the tote bag under cold water to remove excess dye. Start rinsing gently to avoid mixing colors. Continue until water runs clear. Then wash the bag with mild detergent in warm water. Let it air dry completely before use.
Finishing Touches
Finishing touches bring your tie-dyed tote bag to life. This phase ensures the colors stay bright and the fabric lasts long. Proper care and drying help keep your bag looking fresh and vibrant.
Drying Methods
Air drying is the safest way to dry your tote bag. Hang it in a well-ventilated area away from direct sunlight. Sunlight can fade the colors quickly. Avoid using a dryer as heat may cause the dye to bleed or shrink the fabric.
Fixing Colors Permanently
Fixing the dye makes colors last longer. Use a fixative like a vinegar soak or a commercial dye fixer. Soak the bag in a mixture of water and white vinegar for about 30 minutes. Rinse with cold water until it runs clear. This step locks the dye in the fabric fibers.
Caring For Your Tie-dyed Tote
- Wash the tote bag inside out to protect the design.
- Use cold water and mild detergent for washing.
- Avoid bleach and harsh chemicals that weaken colors.
- Air dry the bag instead of using a machine dryer.
- Store in a cool, dry place to prevent mold and mildew.
Following these tips keeps your tote bag vibrant and durable. Enjoy your colorful creation for many uses to come.
Creative Ideas
Creative ideas bring life to your tie dye tote bag project. They help you stand out and express your style. Experimenting with different designs and techniques makes the process fun and rewarding.
Try mixing colors and patterns to create something truly unique. Personal touches turn a simple tote into a special item. Gifts with a handmade feel carry extra meaning and joy.
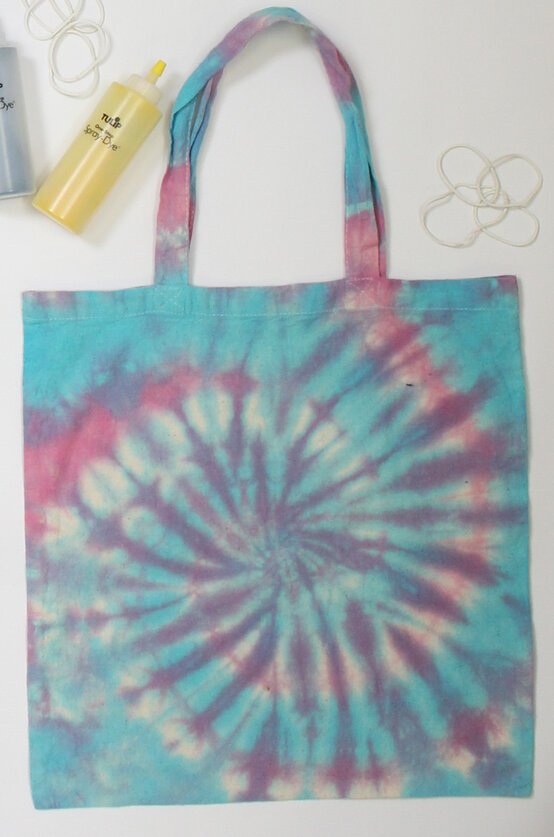
Unique Patterns To Try
- Spiral: Twist the tote and wrap rubber bands for a classic swirl.
- Crinkle: Scrunch the fabric randomly for a textured look.
- Stripes: Fold the tote into pleats and dye in sections.
- Polka Dots: Use small objects to resist dye and create dots.
- Heart Shape: Fold and bind in the shape of a heart before dying.
Personalizing With Additional Art
Use fabric markers to add drawings or words after dyeing. Paint simple shapes or write names for a personal touch. Attach patches or pins for extra decoration. Stitch on beads or sequins for a bit of sparkle. These small details make your tote one of a kind.
Gift And Styling Tips
- Choose colors that match the recipient’s favorite hues.
- Pair your tote with matching accessories for a stylish set.
- Wrap the tote in tissue paper for a neat presentation.
- Include a handwritten note explaining the design’s meaning.
- Use your tie dye tote as a reusable shopping bag.

Credit: www.hobbycraft.co.uk

Credit: www.hobbycraft.co.uk
Frequently Asked Questions
How Do I Prepare A Tote Bag For Tie Dye?
First, wash the tote bag to remove any chemicals or dirt. Use a 100% cotton bag for best results. Keep it damp before applying dye for better color absorption.
What Materials Are Needed To Tie Dye A Tote Bag?
You need fabric dye, rubber bands, plastic squeeze bottles, gloves, and a plastic cover. Also, have water and a plastic bag for setting the dye.
How Long Should I Let The Dye Set On The Tote Bag?
Let the dye set for 6 to 8 hours or overnight. This ensures vibrant colors and long-lasting results on your tote bag.
Can I Use Any Type Of Dye For Tie Dyeing A Tote Bag?
Use fiber-reactive or fabric dyes for cotton tote bags. Avoid all-purpose dyes as they may not provide vibrant or lasting colors.
Conclusion
Tying dye on a tote bag is fun and easy. You can create many colorful patterns. Just follow the steps carefully and enjoy the process. Use bright colors to make your bag stand out. Let your bag dry fully before use.
This craft lets you express your creativity freely. Try different designs to find what you like best. Tote bags with tie dye are unique and personal. Give this project a try and brighten your day. Simple tools and a little time make big art.